How To Automate First-line Support With Twilio Flex

Twilio Flex is known for its popularity among contact centers. Some of the biggest names in the industry have adopted Twilio Flex as their tool of choice for their in-house contact center. However, sometimes even the most powerful tools are not enough to adequately support contact center agents.
Contact center agents are often faced with the difficult task of managing multiple calls; this requires context switching and knowledge transfer in real time. This is where a product like Twilio Flex enables contact center leaders to properly scale their service offerings.
Since Twilio Flex is both a powerful tool and very flexible, it’s possible to create an integration that will ensure your customers are getting 24/7 support from an agent. By integrating vapi.ai, you will be able to provide the customer frontline support, and keep your agents focused on more crucial and complex customer issues.
So, what’s in it for me?
- Eliminate the usage of bots (i.e., voice agents that don't register as human), as well as time-consuming tasks like building static, rule-based flows
- Immediate agent responses that don't sound like a robot
- Increase customer satisfaction
- Decrease the workload of your human agents
Sounds good, but how do I build that?
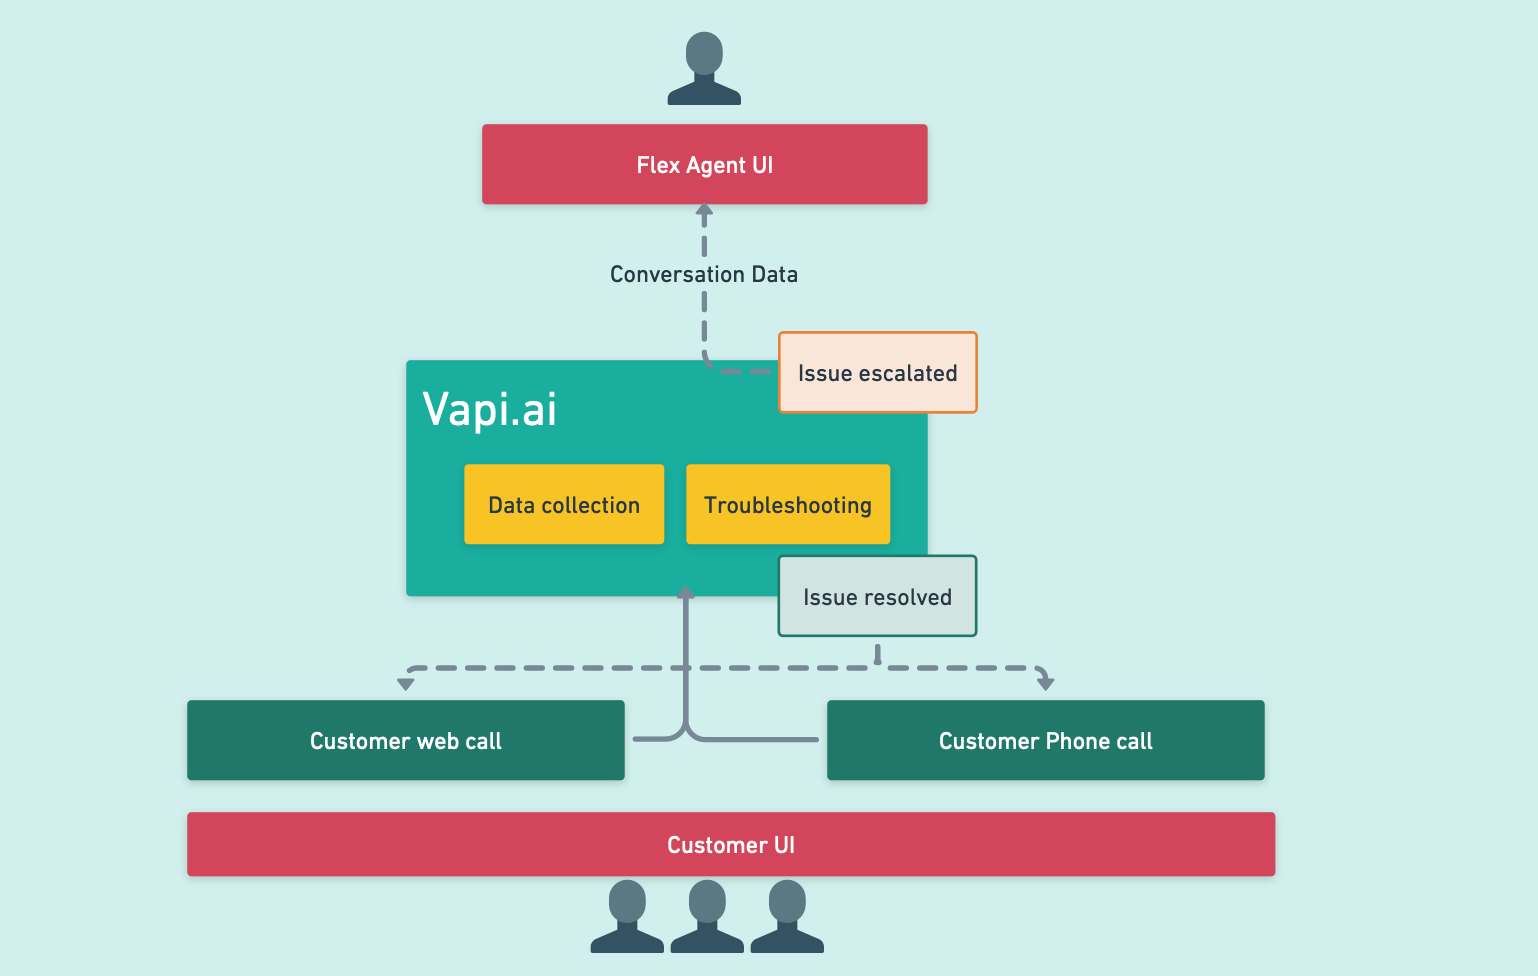
The premise is pretty simple: we will build a solution with a frontend for the customer where they can engage in a call via the web. The customer will tell the frontline support “agent” their issue and some other basic details that the AI can base the conclusion on. Once that is done, the customer will receive an answer on how to resolve the issue; or, if the AI model didn’t find a solution for the issue, all the valuable information that was collected from the customer and the troubleshooting steps that the user has done with the AI will be passed to the human backline agent.
This flow will guarantee that your backline support agent has all the data they need to start investigating and troubleshooting the issue without the need to do a back and forth with the end-user, while also making sure that all the basic troubleshooting steps are already done.
The beauty of it is that the customer might also get an answer before escalating, in which case you won't have to set up intricate, time-consuming flows as you can select which LLM will have a conversation with the customer, e.g., ChatGPT.
You got my attention! What do I need to do?
You will need to have Twilio Flex already running (if not, please follow this guide on getting started with Twilio Flex). Let’s make sure that you have the following pre-requisites:
- Vapi.ai account - please signup and create a new account here
- Next.js - follow these steps for next.js installation
Let’s get to hacking!
Now that we have everything set up, let’s build the frontend. Assuming you already have next.js installed, we will need to build two parts:
- The frontend with vapi.ai SDK
- backend api, with Twilio TaskRouter
Let’s use a prebuilt example that was built with next.js; we will have to clone the following repo: https://github.com/arthemium/vapi-flex-demo.git
Before you run the frontend, let me give you an overview on how it works
Vapi web SDK
- Using the
<Vapi>component (that you can find insrc/components/vapi.tsx), we will create two buttons for starting and ending the call. - The Vapi component is for initializing the Vapi web SDK client:
import Vapi from '@vapi-ai/web';

const vapiKey = process.env.VAPI_KEY ?? "";
const vapi = new Vapi(vapiKey);
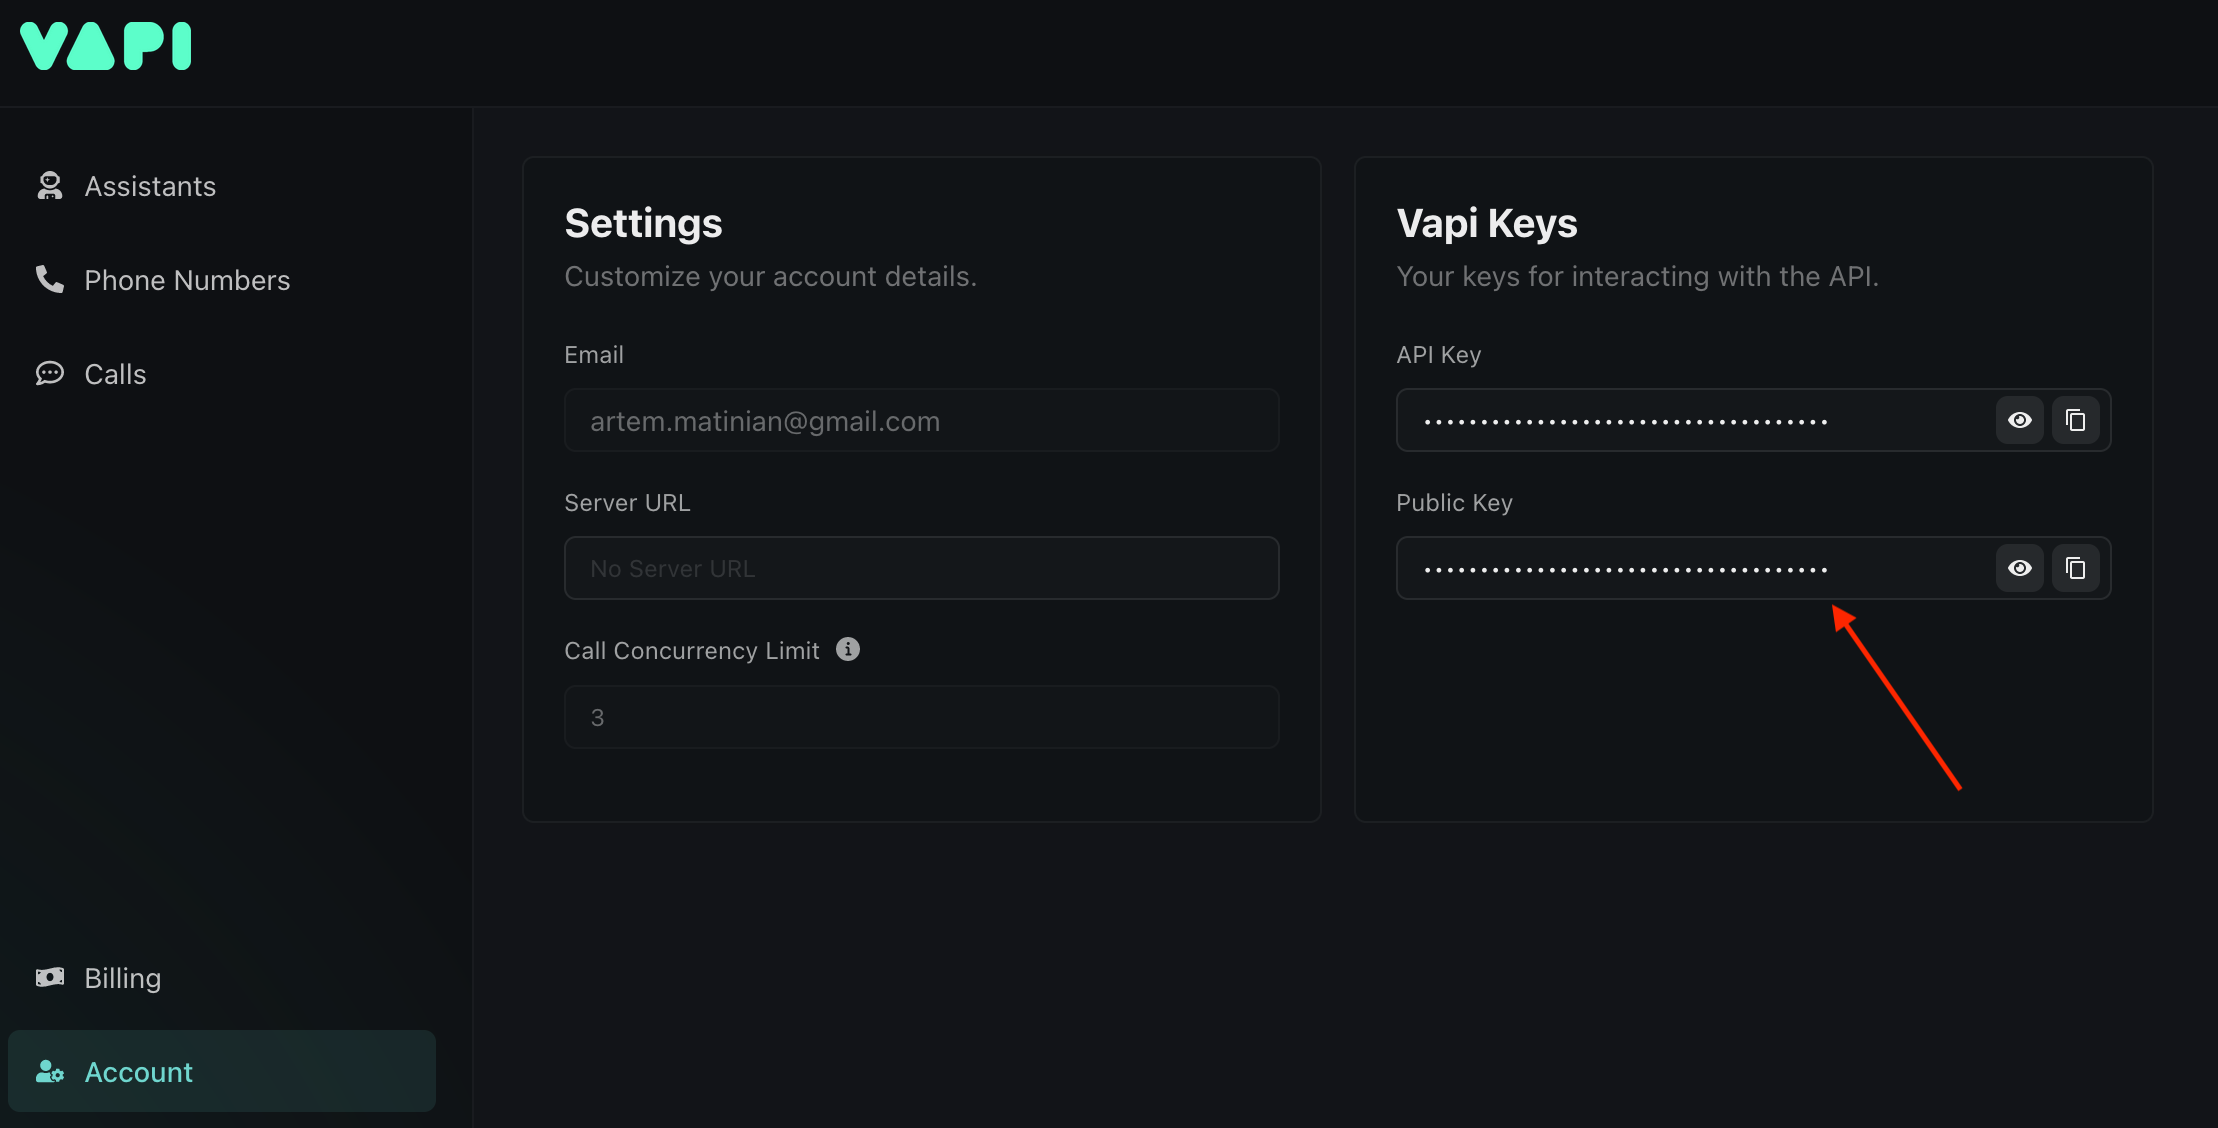
You can find the Vapi public key in your Vapi dashboard, under the Account tab:
You need to either create a new .env file, or rename the already existing .env-temp to .env and replace the values with your valid keys and sids:
TWILIO_WORKSPACE_ID="Your_Twilio_workspace_sid"
TWILIO_ACCOUNT_SID="Your_Twilio_account_sid"
TWILIO_AUTH_TOKEN="Your_Twilo_auth_token"
VAPI_KEY="Your_Vapi_Public_Key"
Vapi Assistant
Once the client is initialized, the startConvo function will trigger vapi.start which takes in the following parameters:
vapi.start({
        model: {
          provider: "openai",
          model: "gpt-3.5-turbo",
          systemPrompt: prompt
        },
         voice: {
          provider: "11labs",
          voiceId: "burt",
        },
        endCallFunctionEnabled: true
      });
This means that a call will start with the user on the browser with the LLM provider as OpenAI (i.e., ChatGPT) and the voice would be provided from 11Labs (the voiceId is burt). You can always change the provider and voice to something else. More information can be found in Vapi assistant guide
You’ve probably noticed that we also pass a prompt. In order for the LLM to have context on that conversation, we are passing the following prompt:
const prompt = `You are frontline support agent, you name is Jake. \\
\\ you should focus on asking the customer two main questions.
\\ what is the issue they are facing and collect the OS, system parameters and when the issue started
\\ try to give the customer few advices, however, be short and if it doesn't help, pass it to backline support.
\\ try to sounds as human as possible, possibly adding 'um' or very short pauses so it will look like you are thinking.
`
This prompt will ensure that the conversation sounds natural and that the “agent” collects the issue and the OS and will try to solve the issue; and if not, it will tell the customer that the issue has been escalated to backline.
Vapi Web SDK events
What's great is that the Vapi web SDK has listeners, and we can also get the transcription of the call in case the issue is escalated to the real agent. We will push all the user input into an array that we will use later. More information about the listeners can be found in the Vapi web SDK repo readme
vapi.on('message', (message) => {
  if(message.role === 'user' && message.type === 'transcript' && message.transcriptType === 'final')  {
    console.log(message);
    customerIssue.push(message.transcript);
  }
  });
Eventually, when the customer ends the call, we will need to send the summary to the real agent and create a task; for that, we will call this event and create a task for Twilio TaskRouter:
vapi.on('call-end', () => {
  createTask(customerIssue)
})
Twilio TaskRouter
First, let’s look at the function that the end-call event is triggering on the frontend:
const createTask = async (data: any[]) => {
  const newTask = await fetch('<http://localhost:3000/api/newtask>', {
      method: "POST",
      body: JSON.stringify(data),
  });
  console.log(newTask)
}
We are calling an API with the data we’ve collected from the user and creating a task. Under the hood, however, we are calling the Twilio API to create a new task for TaskRouter. If you navigate to /src/pages/api/newtask.ts you’ll find the actual request:
import twilio from 'twilio';

const accountSid: string = process.env.TWILIO_ACCOUNT_SID ?? "";
const authToken: string = process.env.TWILIO_AUTH_TOKEN ?? "";
const workspaceSid: string = process.env.TWILIO_WORKSPACE_ID ?? "";
const assignToAnyoneWorkflow = "WW2998cfb7095cfe11322e4a98eafeb025";

const client = twilio(accountSid, authToken);

export default async function handler(req: any, res: any) {
    console.log(req.body);
  const task = await client.taskrouter.v1.workspaces(workspaceSid).tasks.create(
    {
      attributes:
        JSON.stringify({conversation: req.body}),
        workflowSid: assignToAnyoneWorkflow
    });
    res.status(200).json({ taskId: task.sid })
}
Here, we initialize the Twilio client by passing it the Twilio Account SID and Auth Token. You will be able to find the Twilio credentials in your Twilio console:
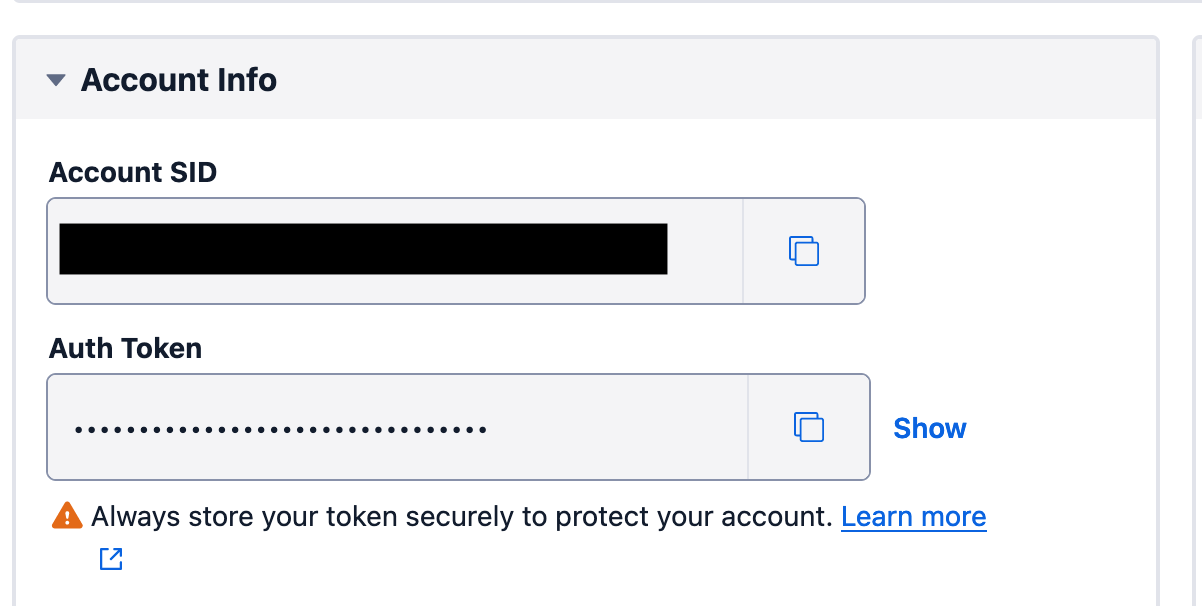
Make sure that you enter these values into the .env file.
Also, replace the assignToAnyoneWorkflow parameter with your workflow Sid.
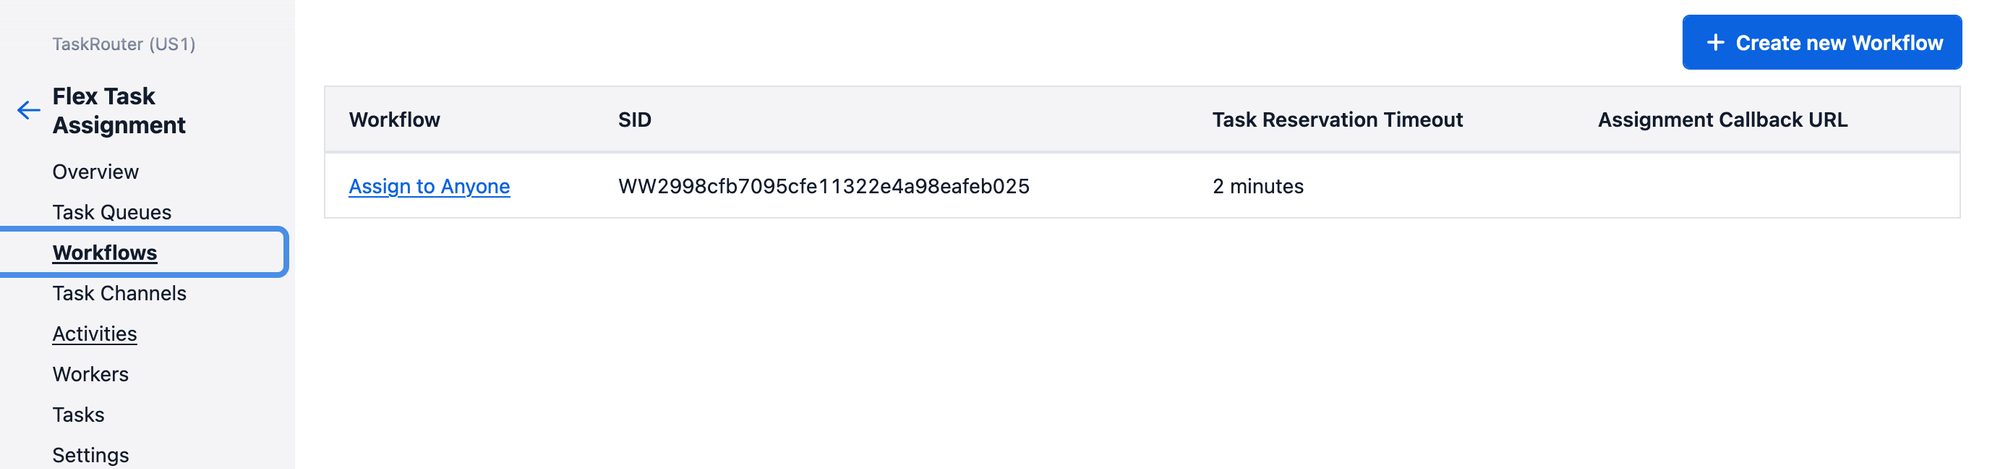
You also need to get the Twilio Workspace SID and Workflow SID:
The Workflow SID is found in your workspace → Workflows
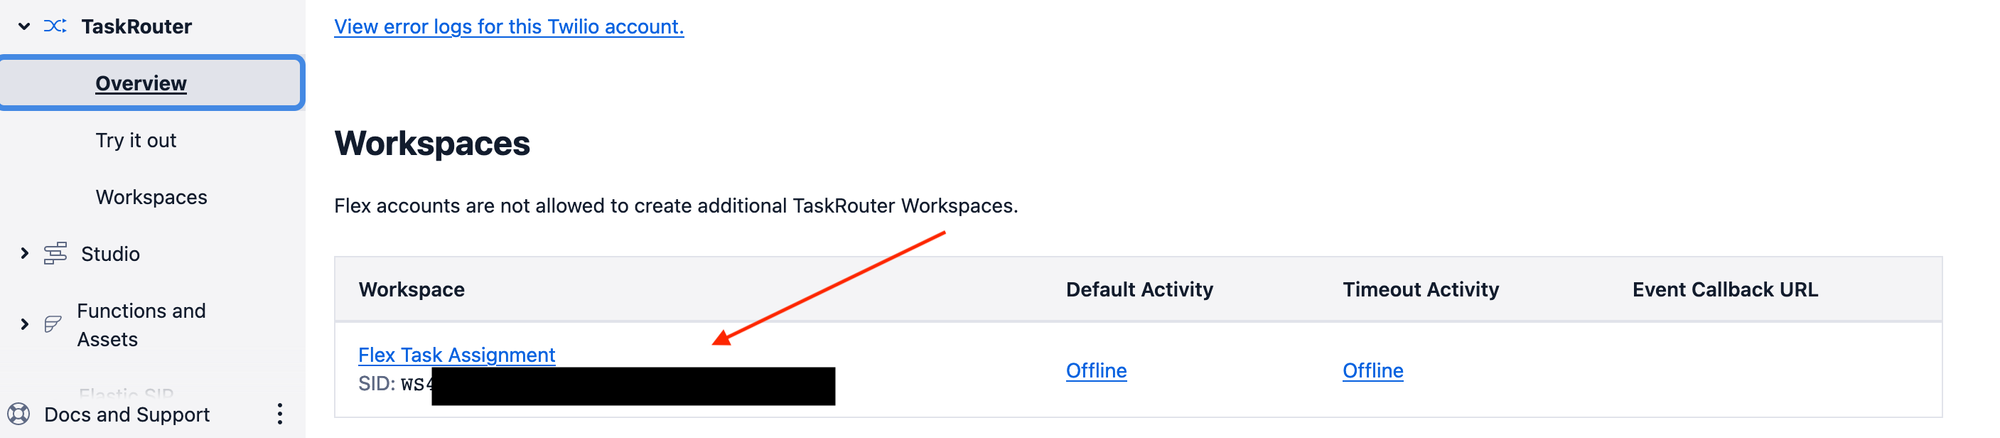
The Worksapce SID can be found in the Twilio Console → TaskRouter → Overview
Now you can actually take it on a test drive before implementing Twilio Flex with it. Go ahead and open a terminal and type npm run dev . You can now start a call and check how well the “agent” is answering your questions. You can always go back and change some of the prompt if you feel something is off.
Connection Twilio Flex
We have all the pieces of the customer puzzle; now we need to make the UI for the agent.
Flex Plugin
Twilio Flex is very customizable, which enables us to customize some of the components in the Flex UI in order to get what we need. First, to get Flex to run locally, you can follow the Flex Quickstart guide.
Adding the call summary to Flex
We would like to add the call summary to the Twilio Flex Infopanel. What we did in the previous steps is add the call summary to the task attributes, and now we need to find a way to extract them. Let’s begin by adding a new component.
- Navigate to your Flex plugin directory. In
/src/components/create a new file; let’s call ittest.jsx - Let’s add the following code to this file:
import React, { useState } from 'react';
import { Manager } from "@twilio/flex-ui";
import { Text } from '@twilio-paste/core/text';

const TaskText = () => {
    const [taskAttributes, setTaskAttributes] = useState("");
    const manager = Manager.getInstance();
    manager.events.addListener("taskAccepted", (task) => {
        console.log("new task received!");
        setTaskAttributes(task?._task.attributes.conversation);
        console.log(taskAttributes);
      });
    return <Text>{taskAttributes}</Text>
};

export default TaskText;
Once a new task comes in and the agent has accepted it, this code will extract the attribute called conversation from the task and populate that to simple text (it’s not pretty, but it works 😄 )
All we have to do now is initialize this component. Edit the main plugin file (usually referred to by the name of the plugin).
Import the component:
import TaskText from "./components/Test"
Add this code below in order to add the text to the agent TaskInfoPanel:
async init(flex, manager) {
    flex.TaskInfoPanel.Content.add(<TaskText key="tasktext"/>);
  }
Now, when your agent gets a new task they will have all of the context of the conversation of the AI agent.